Introduction
Claude, as an AI prototyping assistant, demonstrated impressive efficiency in a cardiac 3D editing software project—generating a complete prototype framework in just 10 minutes. However, it also exposed logical flaws and design redundancies. This article documents four rounds of real iterations, revealing three typical issues in AI-assisted design: missing jump logic, redundant functions, and overlooked edge cases. Practical suggestions such as demand specification, version control, and professional supplementation are provided to offer product managers a new paradigm for human-AI collaboration.

Why Try Claude?
As a product manager, creating prototypes and writing PRDs can be a repetitive process. To achieve a complete functional flow, I often need to create five or six prototype pages, dragging components, aligning them, and adjusting interactions in Axure, which consumes a lot of time.
Having heard about Claude’s strong capabilities in generating prototypes, I decided to give it a try with the mindset of “any time saved is valuable.”
The project I tested was a cardiac 3D generation and editing software aimed at medical students and faculty, which reconstructs cardiac CT DICOM data into 3D models and allows for annotations, measurements, and exports. While it sounds complex, the core functionalities are not too complicated.
My approach was straightforward: I would provide Claude with the requirements and see if it could generate a usable prototype directly or at least how much modification would be needed.
Here’s the complete testing process, revealing both surprises and pitfalls, all recorded authentically.
First Interaction: Prototype in 10 Minutes but Many Issues
My initial prompt was roughly as follows:
“Please generate a prototype for a cardiac 3D generation and editing software based on the core project requirements, including core pages for DICOM import, 3D reconstruction, model viewing, annotation editing, and data export, clearly indicating page jump logic and core functional buttons.”
In less than 10 minutes, Claude generated a complete prototype—an ASCII format static image containing nine interfaces: main interface, DICOM import dialog, metadata preview, reconstruction progress, point annotation operation, line annotation operation, annotation list management, export dialog, and blank state.
At first glance, it was quick and structurally complete. However, upon closer inspection, several issues arose:
- Two interfaces appeared out of nowhere—after DICOM import completion, which page should it jump to? The prototype did not specify. How to enter the annotation interface? There was no entry point.
- Redundant functional buttons—both the annotation management panel and the right-side detail panel had an “edit” button doing the same task. Why have two?
- Inconsistent button names—sometimes it was “confirm,” other times “save,” and occasionally “complete,” using three different terms for the same action.
- Page states were unclear—how to switch between “reconstructed” and “not reconstructed” states? What state is the system in after the user imports data? These were all vague in the prototype.
- Lack of data management concepts—where is the imported data stored? If I have ten patients, how do I manage them? The prototype completely omitted this.
I realized that AI-generated content cannot be directly reused. It can provide a seemingly complete framework quickly, but details and logical flaws need to be manually addressed.
First Round of Optimization: Change to Interactive HTML
While the ASCII diagram was viewable, it couldn’t be demonstrated. I made a new request:
“Please generate an HTML prototype that can run directly in a browser, supporting page switching and basic interactive operations.”
Claude quickly provided a single-file HTML prototype that allowed for page switching and simulated dragging to import DICOM files, with animated reconstruction progress.
However, this version introduced two new issues:
Issue 1: Annotation List Overflow
When I added more than five annotations, the list overflowed, covering the 3D view.
I provided feedback:
“Add a scrollbar to the annotation list; otherwise, it will overflow when there are many annotations.”
Claude added an overflow-y:auto, resolving the issue.
Issue 2: Slice Preview Displays Code
The DICOM preview area was supposed to show thumbnails of 16 slices, but it displayed JavaScript template code instead.
This fix was simple:
“Do not use JS to dynamically generate the slice preview; just write 16 static divs.”
At this point, I realized that AI does not proactively consider edge cases. It won’t anticipate issues like list overflow or JS code not executing in certain environments—you need to test it, and it will adjust afterward.

Second Round of Optimization: Add Data Management Functionality
The first interactive prototype was viewable but lacked data management features. I made a new request:
“The current prototype lacks data management functionality; we need to add two pages for the DICOM database and cardiac model library, supporting search, reconstruction, and deletion operations.”
Claude generated version 2, adding two new pages:
- DICOM Database—displays all imported DICOM data, allowing search, reconstruction, and deletion.
- Cardiac Model Library—displays all generated models, allowing search, annotation, export, and deletion.
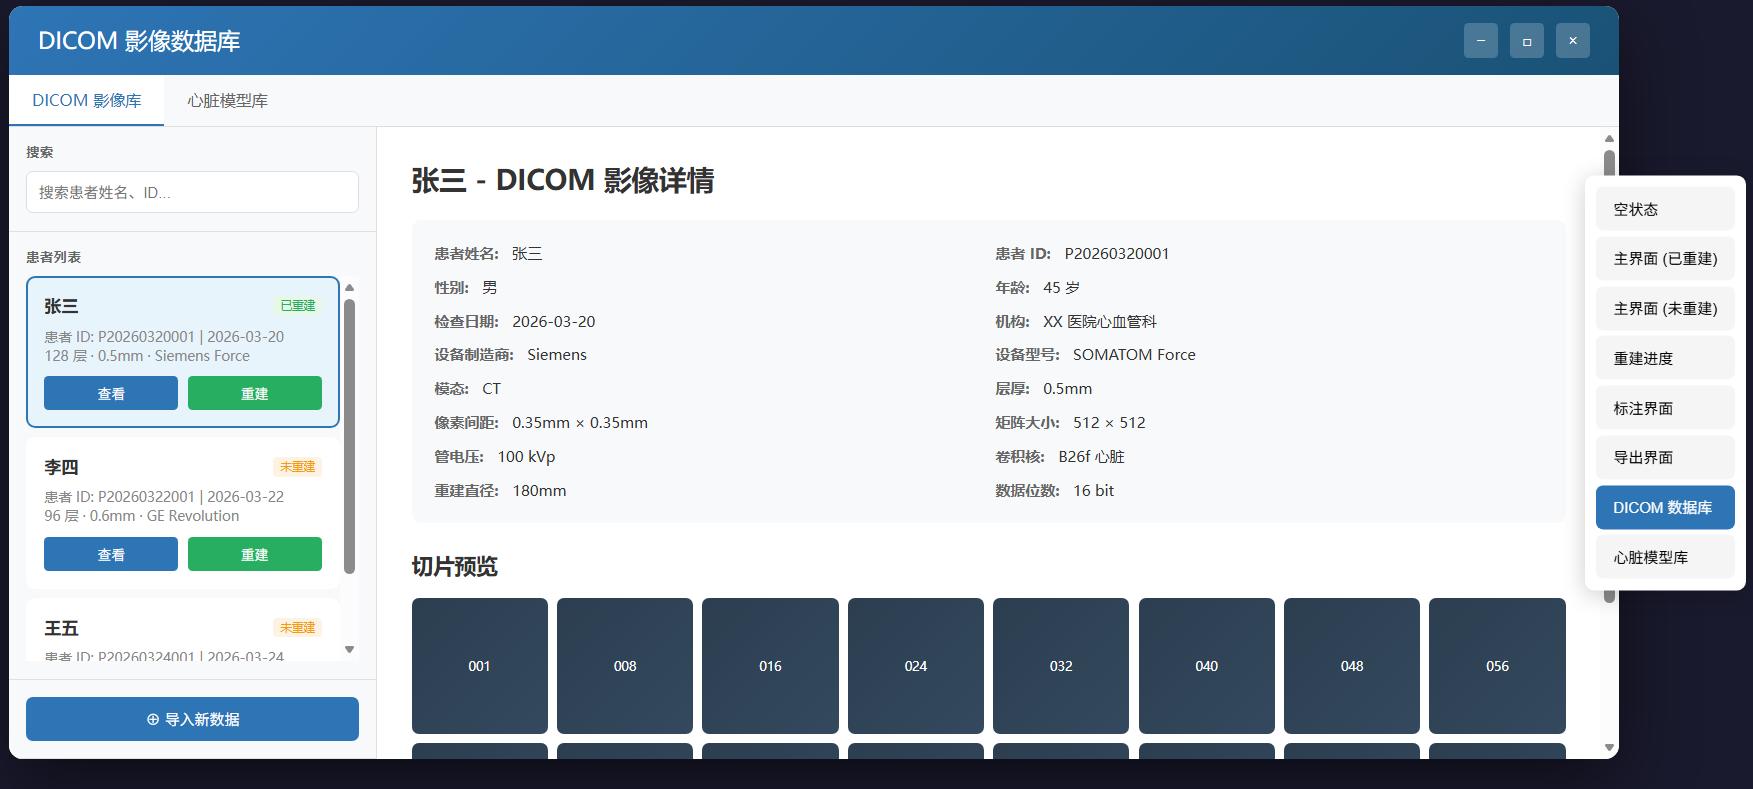
This version looked quite good, but upon detailed review, I found several issues:
- No automatic jump after reconstruction completion—when the user clicks “generate 3D model,” the progress bar finishes, but it remains on the main interface, requiring a manual switch to the model library to see the result.
- Inconsistent annotation editing entry—there was an edit button in the left annotation list and another in the right detail panel, both doing the same thing.
- Redundant export options—there was an export function for “model report,” which is rarely used in practice.
I continued to provide feedback to Claude:
“Automatically jump to the model library after reconstruction completion; otherwise, the user has to switch manually.”
“Unify the annotation editing entry; keep it only in the left list and remove it from the right.”
“Remove the ‘model report’ export option and keep only STL and JSON.”
Third Round of Optimization: A Failed Layout Restructuring
By this point, the prototype was usable, but I got a bit greedy and wanted a more modern layout. I made a request:
“Redesign the layout with a more modern card-style design.”
This version completely failed.

Claude’s version 3 rearranged the entire layout structure—functional areas were misaligned, the 3D viewing area was compressed into a corner, and the navigation hierarchy was confused.
My feedback was:
“This prototype has significant issues! All functional areas are misaligned, making it impossible to browse normally. It is much worse than the previous version; please modify it based on the last version.”
This taught me a lesson: when requesting “optimization” from AI, be clear about what to keep unchanged and what to modify. Saying “optimize layout” can lead it to interpret it as “start over,” resulting in a worse outcome.
Fourth Round of Optimization: Fine-Tuning Based on Version 2
Version 3 was abandoned, and I returned to version 2 for further modifications. This time, my requests were very specific:
“Based on version 2, make the following optimizations:
- Automatically jump to the model library after reconstruction completion.
- Add a ‘return to main interface’ button to all subpages.
- Add inline edit and delete buttons to the annotation list items.
- Remove the redundant ‘model report’ export option.
- Unify the annotation editing entry, keeping it only in the left list.”
After this round of modifications, I finally received version 4—the final prototype with coherent logic.
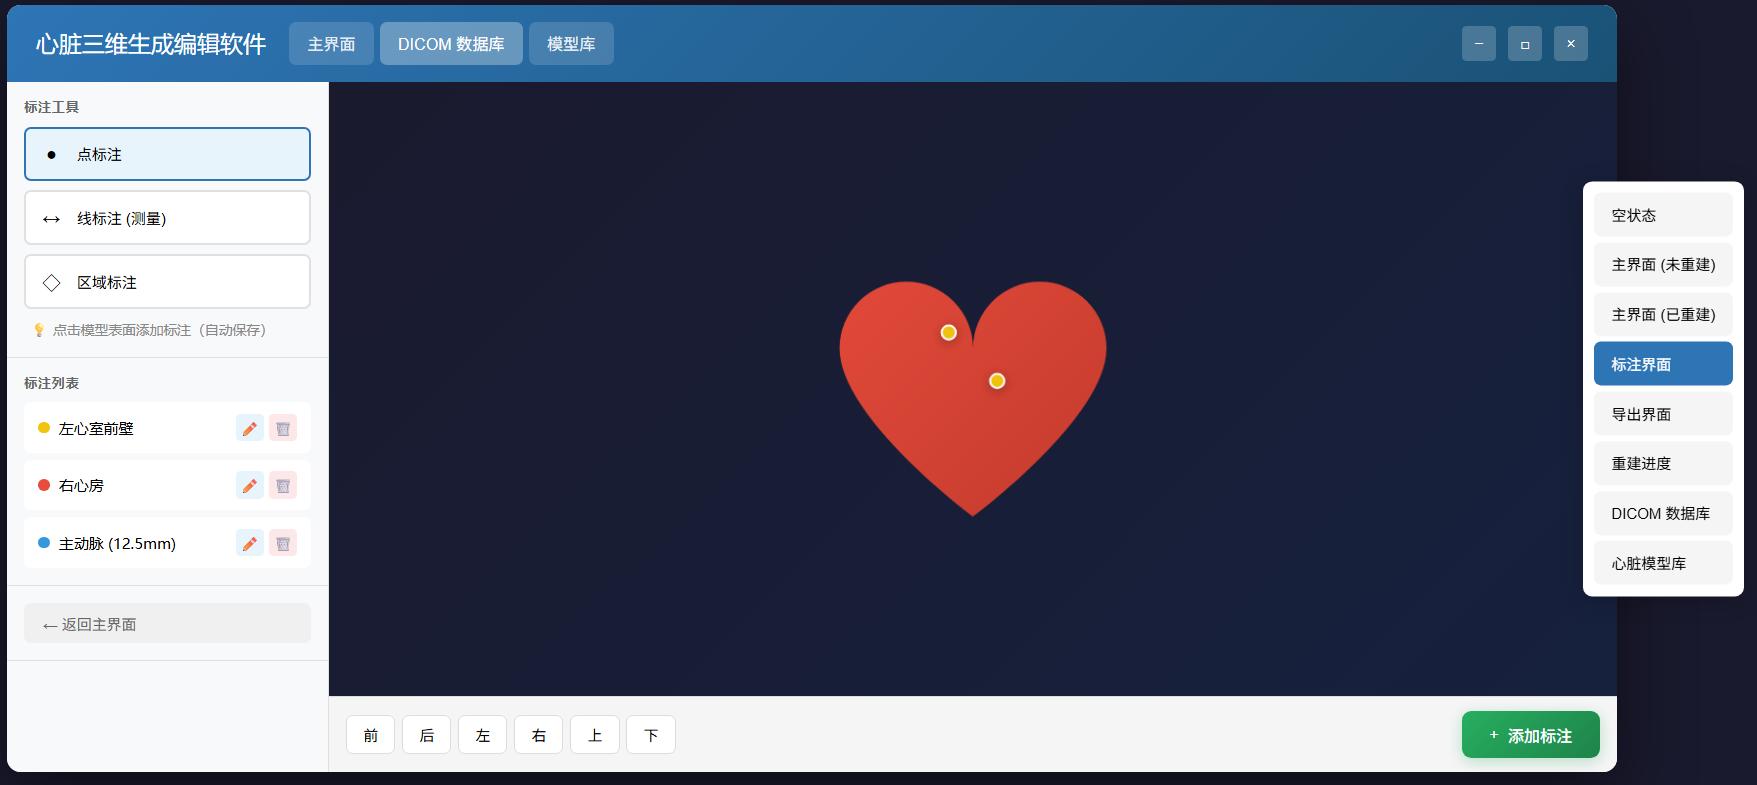
Final Version Feature List:
- Data Import Module: Drag-and-drop import, click to select, DICOM metadata reading, slice preview.
- Patient/Model Management: Patient list, DICOM database, model library, status indicators.
- 3D Reconstruction Module: One-click generation, progress bar animation, five-step process display, estimated time, automatic jump upon completion.
- 3D Viewing Module: Model display, rotation, zoom, pan, six quick view buttons.
- Annotation Editing Module: Point/line/area annotations, annotation list, edit/delete, auto-save.
- Data Export Module: STL model export, JSON annotation export.
- Navigation Module: Top navigation bar, return to main interface button, page state switching.
After four rounds of dialogue and nearly two hours of adjustments, this prototype was basically usable.
Efficiency Comparison: Faster but Needs Oversight
I calculated the time:
If I had used Axure to create this set of prototypes traditionally, it would take at least 10 hours (not including revision time). Using Claude, it took about 1.5 hours from start to finish, achieving an efficiency improvement of about 10-15 times.
However, this “efficiency improvement” comes with a caveat: you need to spend time reviewing, identifying issues, and providing feedback for modifications. AI will not give you a perfect answer in one go; it acts like a fast but inexperienced intern—you need to guide, teach, and supervise it.
Suggestions for Product Managers Considering AI
Based on my testing experience, here are some specific suggestions:
1. Don’t Expect Perfection on the First Try When I first received the prototype, I thought it would be ready to use. After careful review, I found five or six issues. So don’t cut corners; always review AI-generated content, focusing on jump logic, state changes, and edge cases.
2. Be Specific in Your Requests Vague requests like “optimize the layout” are not understood by AI. Be specific, such as “based on version 2, unify the annotation editing buttons in the left list and remove them from the right.” The more specific, the better.
3. Retain Historical Versions When I messed up version 3, I was fortunate to have version 2 to revert to. Always ask AI to back up before making modifications, or save a copy yourself.
4. Supplement Professional Content Yourself For specialized requirements like DICOM compatibility and integration with simulation systems, Claude’s understanding is shallow; you need to supplement it. Its strength lies in “rapid implementation,” not “deep thinking.”
5. Pay Attention to Jump Logic This was the most problematic area in my testing—AI-generated prototypes often miss interface jumps and state changes. After each round of modifications, walk through the process yourself to check for any breakpoints.
Future Plans
In this test, I only used Claude, but I plan to try a combination approach:
First, use ChatGPT to plan the requirement document and prototype prompts, then use Claude to generate the prototype.
The idea is that ChatGPT may be stronger in requirement analysis and structured expression, allowing it to break down the requirements and write prompts well. Claude excels in code generation and prototype realization, so I’ll let it handle the implementation. I’ll see if this method can reduce logical and detail issues in AI generation.
If there are updates, I will write a separate article to share.
Final Thoughts
My experience using Claude to generate prototypes can be summarized as follows:
It is an efficient “junior prototyping designer”—quick output and easy modification, but it requires guidance and review.
It cannot completely replace a product manager’s thinking, but it can liberate us from repetitive drawing tasks, allowing more focus on requirement analysis, logical structuring, and user experience.
You clarify “what to do” and “why to do it,” Claude quickly realizes “what it should look like,” and you review “where the issues are,” while it handles “modifications and optimizations”—this collaborative model may represent the best practice for AI-assisted product work at this stage.
Comments
Discussion is powered by Giscus (GitHub Discussions). Add
repo,repoID,category, andcategoryIDunder[params.comments.giscus]inhugo.tomlusing the values from the Giscus setup tool.